First you will:
- Measure your box around and from top to bottom, make sure you add 1.5 inch to what ever number you get so that your fabric can over lay at different meeting points ( my measurement were 26 around and 6.5 up and down)
- Once you measure your box cut out a piece of fabric with the length and width of your box (and yes it should be a long rectangle,just in case your brain just gave out)
- Fold ONE side of you fabric about a half of an inch in and pin it so it can stay together. ( make sure you look at the picture on the top left)
- By using either a sewing machine, needle and thread or hot glue hem ( sew) pinned area.
- Get your piece of paper and trace the face of your box, and cut it out a teeny bit bigger than what you originally traced it to be. Transfer this piece of paper to the fabric and cut out 2 circles of fabric.
- YOUR RECTANGLE PIECE MIGHT BE A LOT OR A LITTLE BIGGER THAN YOUR BOX TRIM IT SO THAT ONLY AND INCH OR .5 AN INCH IS OVERLAPPING THE TOP AND BOTTOM OF YOUR BOX
- DON'T PUT THE FABRIC ON THE BOX YET.
- On the side of your box there should be 2 lines, these are where the box is held together, in between these lines you will eventually out a hole. Don't put the hole on either of these lines
- get another piece of paper and trace a rectangle about 8 inches long and 2 inches wide. ( it may need to be bigger or smaller depending on your box)
- cut it out and tape it in the middle of the two line on your box.
- Get X acto knife and carefully and slowly saw around the shape of the rectangle until you have cut around the entire rectangle. Carefully remove cut out piece and admire the awesome rectangle hole you just made.
Next you will:
- Get your large rectangle shaped piece and fold it in half (make sure its even) make a small mark about 4 inches away from the center of the fabric piece.( we are making a hole for the zipper, these were the measurements for my box, make sure YOUR hole is smaller than your zipper) Get your scissors and cut a half of an inch into your fabric where you made the mark.
- From there cut over 6 inches and then cut another half of an inch slit to finish the cut, The cut should look like this ] unfold you fabric and you should have a hole the shape of a rectangle that is 1 inch wide and 6inches long.
- Get your zipper put it over and align its track with the center of the hole, pin it down and then sew it (with machine or by hand) to the fabric.
- Heat up your hot glue gun and make sure you have plenty of glue sticks for it.
- You are now gluing the fabric to the box, READ CAREFULLY place non hemmed side of fabric on the complete opposite side of the hole in the box or in a place that would allow your zipper to perfectly align with the hole.(put the non hemmed piece on bottom of box opposite of hole)
- little by little and all the while pulling very tightly (without ripping) glue and wrap fabric around cylinder, pull especially tightly where the zipper covers the hole. go all the way until the not hemmed side meets the hemmed side. (I suggest that when you glue and wrap to squirt a bit of glue in a vertical line and wrap fabric around while adding a line of glue ever inch or half inch)
- the sides of your now glued rectangle piece should be overlapping the faces of your box sort of riming them. If necessary cut down until about a half inch of fabric is showing over the face of the box.
- glue the fabric rimming the face of the box down to the box, and glue the two circles you cut out. (not to insult your intelligence but glue 1 circle to each face, there are 2 faces)
- glue the edges of the faces down so they don't stick out. Now get your trim and glue it around the edge of the face you would like to use as the front of your clock purse.(glue trim over front glued down edges)
- depending on what your strap is made out of (chain, fabric, etc) the application process may very but I used a chain strap. I got paper clips un-folded them and refolded the to resemble a bobby pin with a pointed top. I then from the inside of the purse punctured two holes with the legs of my paperclip and had them sticking out from the outside, (I did this near the zipper)I the placed one side of my chain on one of the open legs and twisted the legs together to secure it. I then cut of the access leg wire and repeated on other side.
Lastly
- Get your wood piece and paint it white. Paint about four coats letting each one dry before another is applied.
print off a well like picture of clock numbers on a clock ( roman numerals look better) and tape it to the center of your wood piece, carv numerals into wood with X acto knife by tracing the numbers with pressure.
I used this clock face to trace :
http://www.thewoodshop.20m.com/graphics/clockface_roman01.jpg
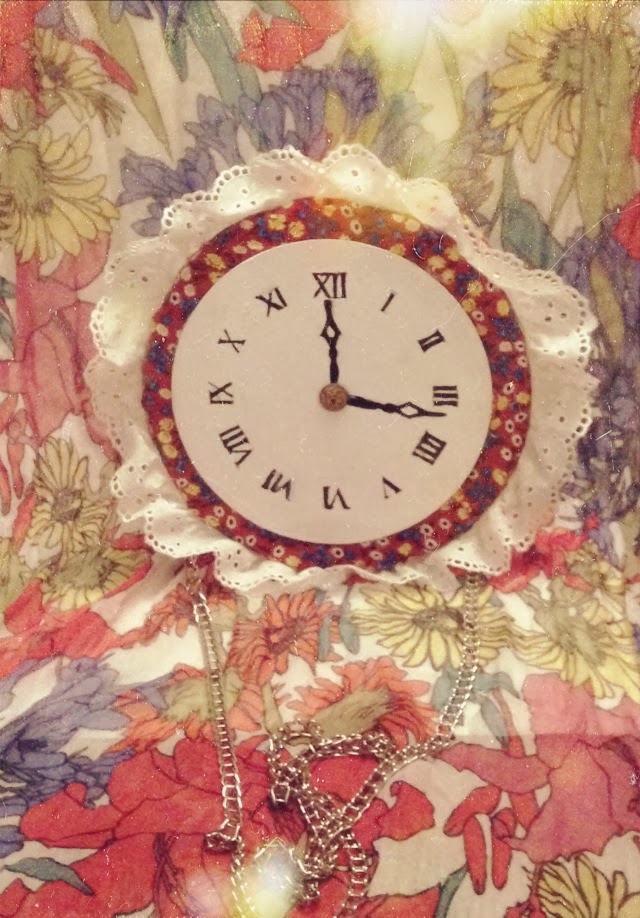
study my picture carefully
- finally go over your tracings with black paint (see picture)and add clock hands of your liking ( I drew my own and painted them but,your can always trace them like the numbers with a Google picture) glue a cute button in the middle of your clock and and make sure your hands look like their coming out of it. (see picture again :)once dried gloss with shine/finish spray glaze.
- Glue wood piece to front face of box and TADAA!!
|
| | | | | | | |
|
| | | | | | | | | | | | | |
|